super simple. 3 sections 1 - 2 inches wide across the head from ear to ear. i just did one section a t a time. first section, divide into 4. tiny ponies and then split the pony and flip. loving my topsy tail for these. next section, into 3. split the sections so they stack on the first row. take half of the pony in front of it into the pony behind it. on the ends, leave half of the pony hanging loose. last section gets split into 2.

you can keep going if you split the sections into 4, 3, 4, 3 . . .all the way back. i think it gets to be a bit much.

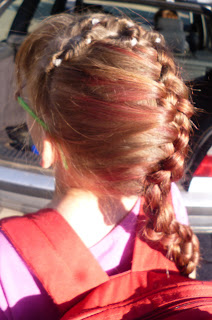
with the braiding, i started with the hair behind the 2 ponies. split into 4 pieces and twist the right 2 together, then the left 2 together and cross the center 2. if your twisting them the same direction they should cross correctly in the center. it always throws me off though because i want to twist out on both or in on both but that makes the center wrong. braiding 4 looks really neat though. it twists the whole braid naturally.
 a row of turned ponies to the side instead of back. it just held her little whispys back. cute option to braiding.


two more versions of this turned pony. just the quilting which is nice for church. really the only place my tomboy princess can wear her hair down like this


this one ended up a request at her friend's princess birthday party. i went over a little early and did her friend's hair this way too. she was thrilled! nice when you can do something so simple and make a little girl feel like a princess

No comments:
Post a Comment